```html
How To Install Tile Wall In Bathroom
Installing tile on a bathroom wall is a significant home improvement project that can dramatically enhance the aesthetic appeal and functionality of the space. While the process can appear daunting, meticulous planning, the right tools, and a systematic approach can yield professional-looking results. This article provides a comprehensive guide on how to install tile on a bathroom wall, covering preparation, installation, and finishing steps. Successful tile installation requires patience and attention to detail, ensuring a durable and visually pleasing outcome.
Before embarking on the project, it is crucial to understand the scope of the work. This involves assessing the existing wall condition, selecting appropriate tiles and materials, and determining the layout pattern. A thorough preparation phase is paramount to a successful and long-lasting tile installation.
Preparing the Bathroom Wall
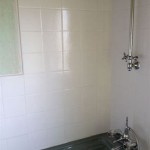
The first step in preparing the bathroom wall is to ensure a clean and structurally sound surface. Remove any existing fixtures, such as showerheads, faucets, and towel bars. Carefully detach any loose or damaged tiles, and thoroughly clean the wall with a degreasing cleaner to remove soap scum, mildew, and other residues. A clean surface is essential for proper adhesion of the tile adhesive.
Inspect the wall for any signs of damage, such as cracks, holes, or water damage. Repair any imperfections using patching compound. Allow the patching compound to dry completely according to the manufacturer's instructions before proceeding. For significant damage or unevenness, consider applying a cement backer board, such as HardieBacker or Durock. These boards provide a stable and waterproof surface specifically designed for tile installations.
If installing cement backer board, measure and cut the boards to fit the wall dimensions, leaving a small gap (approximately 1/8 inch) between the boards and the adjacent walls or surfaces. Secure the backer board to the studs using cement board screws, ensuring that the screws are countersunk and do not protrude above the surface. Apply fiberglass mesh tape to the seams between the backer boards and cover with a thin layer of thin-set mortar. This process creates a seamless and waterproof substrate.
Priming the wall is an essential step for ensuring proper adhesion. Apply a suitable primer to the prepared wall surface, following the manufacturer's instructions. The primer helps to seal the surface, prevents moisture absorption, and promotes a strong bond between the wall and the tile adhesive. Allow the primer to dry completely before proceeding to the next step.
Planning the Tile Layout
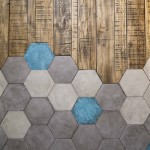
Before applying any adhesive, plan the tile layout to ensure a visually appealing and balanced design. Consider the size and shape of the tiles, the grout line width, and the overall aesthetic you wish to achieve. A well-planned layout minimizes awkward cuts and ensures that the finished result is symmetrical and pleasing to the eye.
Determine the focal point of the wall, typically the area that is most visible or aesthetically important. Center the design on this focal point, working outwards to the edges of the wall. Use a level and measuring tape to establish a grid on the wall, marking the position of each tile with a pencil. This helps to visualize the layout and identify any potential problems or adjustments that need to be made.
Pay close attention to corners and edges. Ideally, avoid using small slivers of tile in these areas. Adjust the layout as needed to ensure that the tiles at the edges are at least half the width of a full tile. This creates a more balanced and professional appearance.
Consider incorporating decorative elements, such as accent tiles or borders, into the layout. These elements can add visual interest and personalize the design. Be sure to carefully plan the placement of these elements to ensure that they are properly aligned and integrated with the overall tile pattern.
Applying Tile and Grout
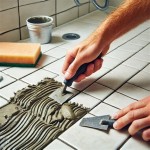
Once the wall is properly prepared and the layout is planned, the next step is to apply the tile adhesive, commonly referred to as thin-set mortar. Choose a thin-set mortar specifically designed for the type of tile you are using and the substrate you are applying it to. Mix the thin-set mortar according to the manufacturer's instructions, using a mixing drill and a bucket. The consistency should be similar to peanut butter, allowing it to hold its shape without being too runny.
Using a notched trowel of the appropriate size, apply the thin-set mortar to a small section of the wall, typically no more than a few square feet at a time. Hold the trowel at a 45-degree angle and spread the mortar evenly, creating ridges. These ridges help to ensure proper adhesion and prevent air pockets from forming beneath the tiles.
Carefully place the tiles onto the thin-set mortar, pressing them firmly into place. Use tile spacers to maintain consistent grout lines between the tiles. The size of the spacers will depend on the desired width of the grout lines. Gently twist the tiles as you set them to ensure good contact with the adhesive.
Use a level to ensure that the tiles are properly aligned and plumb. Make any necessary adjustments while the thin-set mortar is still wet. Remove any excess thin-set mortar from the surface of the tiles with a damp sponge. Continue this process, working your way across the wall until all the tiles are installed. Allow the thin-set mortar to cure completely according to the manufacturer's instructions, typically 24 to 48 hours.
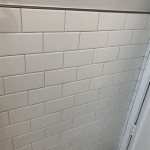
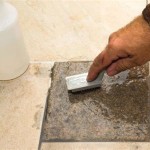
After the thin-set mortar has cured, remove the tile spacers. Prepare the grout according to the manufacturer's instructions. Apply the grout to the tile surface using a grout float, working it into the grout lines at a 45-degree angle. Ensure that the grout lines are completely filled.
Remove excess grout from the tile surface with a damp sponge, rinsing the sponge frequently. Work diagonally across the tiles to avoid pulling grout out of the grout lines. After the initial cleaning, allow the grout to haze over. Use a clean, dry cloth to buff the tile surface and remove the haze. Allow the grout to cure completely according to the manufacturer's instructions, typically 72 hours.
Finally, apply a grout sealer to protect the grout from stains and moisture. This will help to prolong the life of the grout and keep it looking clean. Follow the manufacturer's instructions for applying the grout sealer.
Installing tile on a bathroom wall is a labor-intensive process that requires careful planning and execution. By following these steps, a professional-looking and durable tile installation can be achieved, enhancing the beauty and functionality of the bathroom.
```
How To Install Wall Tile In Bathroom

How To Install Wall Tile In Bathroom Howtospecialist Build Step By Diy Plans

How To Install A Shower Tile Wall Bathroom

How To Tile A Bathroom Shower Walls Floor Materials 100 Pics Pro Tips

Shower Tile Installation Step By Four Generations One Roof

Diy Bathroom Wall Tile And Tiling Guide For Beginners

How To Install Wall Tile In Bathroom Howtospecialist Build Step By Diy Plans

How To Install Easy Subway Wall Tile Pneumatic Addict

A Diy Shower Tile Step By

Related Posts