How To Remove Tile Walls In A Bathroom: A Comprehensive Guide
Removing tile walls in a bathroom can appear to be a daunting task, but with the right tools, techniques, and a methodical approach, it becomes a manageable DIY project. This article provides a thorough guide on how to safely and effectively remove tile walls, minimizing damage to the underlying structure and preparing the surface for future renovations.
Key Point 1: Preparation and Safety Measures
Before commencing any demolition work, careful preparation is paramount. This involves gathering the necessary tools and safety equipment, protecting the surrounding areas, and shutting off utilities to the bathroom to prevent potential hazards.
Tools and Materials: A comprehensive toolkit is essential for a successful tile removal project. This typically includes:
- Safety Glasses: Imperative to protect eyes from flying debris.
- Gloves: To protect hands from sharp edges and potential irritants.
- Dust Mask or Respirator: To prevent inhalation of tile dust, which can be harmful.
- Hammer: For striking chisels and prying tiles.
- Chisels (Various sizes): For loosening and removing tiles. A cold chisel and a wider, flat chisel are recommended.
- Pry Bar: To assist in levering off larger tile sections.
- Utility Knife: For scoring grout lines and cutting caulk.
- Grout Saw: For removing grout, particularly in tight spaces or around delicate fixtures.
- Scraper: For removing adhesive residue.
- Shop Vacuum: For efficient dust and debris removal.
- Drop Cloths or Plastic Sheeting: To protect the floor, bathtub, and other bathroom fixtures.
- Duct Tape: To secure protective coverings.
- Garbage Bags or Buckets: For disposing of tile debris.
- Moist Sponge: For cleaning surfaces.
- Putty Knife: For smoothing surfaces after adhesive removal.
Protecting the Surrounding Areas: The demolition process inevitably creates dust and debris. To minimize the impact on the rest of the house, seal off the bathroom effectively. Cover doorways with plastic sheeting and secure them with duct tape. Protect the floor with drop cloths. If the bathtub or shower enclosure is staying, cover it with heavy-duty plastic sheeting and secure it well. Remove any easily removable items from the bathroom, such as mirrors and accessories, to prevent damage.
Shutting Off Utilities: Before starting, turn off the water supply to the bathroom to prevent accidental flooding if any pipes are inadvertently damaged during the process. If electrical work is planned after the tile removal, it is also advisable to turn off the electricity to the bathroom at the circuit breaker.
Key Point 2: Tile Removal Techniques
The actual tile removal process requires a strategic approach to minimize damage to the wall substrate. Several techniques can be employed, depending on the type of tile, adhesive, and underlying wall material.
Scoring Grout Lines: The first step is to weaken the grout lines surrounding the tiles. This can be done using a utility knife or a grout saw. Scoring the grout lines creates a pathway for the chisel, making it easier to separate the tiles from the wall. A grout saw is particularly useful for removing grout in tight spaces or around fixtures.
Using a Chisel and Hammer: Position the chisel at an angle against the edge of a tile, ideally at a grout line. Gently tap the end of the chisel with the hammer. Gradually increase the force until the tile begins to loosen. Work your way around the tile, applying pressure to different points until it comes loose. Avoid excessive force, which can damage the wall behind the tile. A wider, flat chisel is often better for larger tiles, while a smaller cold chisel is effective for smaller tiles or in areas where precision is needed.
Employing a Pry Bar: For larger tiles or sections of tiles that are stubbornly adhered to the wall, a pry bar can be helpful. Insert the pry bar behind the tile and gently lever it away from the wall. Use caution to avoid damaging the wall surface. It is often helpful to use a piece of wood as a fulcrum to protect the adjacent surfaces.
Dealing with Difficult Tiles: Some tiles may be particularly difficult to remove. In such cases, consider using a heat gun to soften the adhesive. Apply heat to the tile for a few minutes, then try again with the chisel and hammer. If the adhesive is exceptionally strong, it may be necessary to score the tile itself to create cracks that weaken its bond to the wall. Be extremely cautious when breaking tiles to avoid sharp fragments.
Removing Tiles Around Fixtures: Removing tiles around fixtures, such as toilets, sinks, and bathtubs, requires extra care. Use a grout saw to carefully remove the grout around the fixture. Work slowly and methodically to avoid damaging the fixture. Once the grout is removed, gently pry the tiles away from the wall, being mindful of any potential for leaks or other issues. It may be necessary to disconnect the fixture temporarily to facilitate the tile removal process.
Key Point 3: Adhesive Removal and Wall Preparation
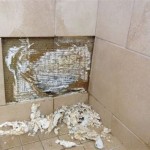
Once the tiles are removed, the next step is to remove the residual adhesive and prepare the wall surface for refinishing. This process varies depending on the type of adhesive used.
Identifying the Adhesive: Different types of adhesives require different removal methods. Common types of tile adhesive include thin-set mortar, mastic, and epoxy. Thin-set mortar is a cement-based adhesive that is typically hard and brittle. Mastic is a pre-mixed adhesive that is often softer and more pliable. Epoxy is a strong, waterproof adhesive that is usually more challenging to remove.
Adhesive Removal Methods:
Thin-Set Mortar: This frequently requires mechanical removal. A chisel and hammer can be used to scrape off the mortar. A power scraper or angle grinder with a diamond grinding wheel can also be effective. When using power tools, always wear appropriate safety gear, including safety glasses, a dust mask, and ear protection.
Mastic: Mastic can often be softened with heat or solvents. A heat gun can be used to soften the mastic, making it easier to scrape off with a putty knife or scraper. Alternatively, a solvent such as mineral spirits or adhesive remover can be applied to the mastic to soften it. Follow the manufacturer's instructions for the solvent and ensure good ventilation.
Epoxy: Epoxy is the most difficult adhesive to remove. Mechanical removal with a power scraper or angle grinder is usually necessary. Chemical strippers designed for epoxy removal can also be used, but these are often harsh and require careful handling and ventilation.
Leveling and Repairing the Wall: After removing the adhesive, inspect the wall surface for any damage. Fill any holes or cracks with patching compound. Use a putty knife to apply the compound smoothly and evenly. Allow the patching compound to dry completely before sanding it smooth. Sanding is crucial to creating a flat, even surface for the new finish.
Cleaning the Wall: Thoroughly clean the wall surface to remove any remaining dust, debris, or residue. Use a damp sponge or cloth to wipe down the wall. Allow the wall to dry completely before applying any primer or paint. A clean, dry surface is essential for proper adhesion of the new finish.
Priming the Wall: Applying a primer to the wall is crucial for proper adhesion of the new finish. Choose a primer that is compatible with the wall material and the new finish. Apply the primer evenly using a brush or roller. Allow the primer to dry completely before proceeding with the new finish. A properly primed wall will ensure a long-lasting and durable finish.
By following these steps carefully, any individual with basic DIY skills can successfully remove tile walls in a bathroom and prepare the surface for future renovations, whether it be new tile, paint, or other wall coverings. Safety precautions should always be a priority throughout the process, and patience is key to achieving professional-looking results.

How To Remove A Bathroom Wall Tile Today S Homeowner

Edited Removing Tile From Bathroom Walls Hometalk

How To Demo Tile Mortar Metal Mesh In Bathroom Walls Young House Love

How To Remove Bathtub Shower Wall Tiles

How To Remove A Tile Backsplash Homeserve Usa

How To Remove Tiled Shower Walls The Floor Elf

How To Remove Floor And Wall Tiles Without Breaking Them

How To Remove Wall Tiles 11 Steps With Pictures Wikihow

Diy Half Bathroom Demolition The Handyman S Daughter

Preparing Walls For Tiling Removing Old Tiles Bathroom Guru
Related Posts