Can You Lay Vinyl Planks Over Ceramic Tiles?
Laying new flooring can significantly enhance a room's aesthetic and functionality. Vinyl plank flooring has emerged as a popular choice due to its durability, water resistance, and ease of installation. A common question that arises during home renovation projects is whether vinyl plank flooring can be installed directly over existing ceramic tile. The answer, while generally affirmative, involves several crucial considerations and steps to ensure a successful and long-lasting result.
Installing vinyl plank flooring over ceramic tile can save time and money by avoiding the labor-intensive and dusty process of removing the existing tile. However, it is not a universally applicable solution. The success of this installation method hinges on the condition of the existing tile, the type of vinyl plank flooring selected, and the preparation undertaken before installation. Ignoring these factors can lead to problems such as uneven surfaces, premature wear, and potential damage to the vinyl planks.
Before embarking on this project, a thorough assessment of the existing ceramic tile is essential. This assessment will determine whether the tiles are a suitable substrate for vinyl plank flooring. The subsequent sections will delve into the key considerations for a successful installation, focusing on preparation, material selection, and potential challenges.
Assessing the Existing Ceramic Tile
The foundation for a successful vinyl plank installation over ceramic tile is a stable and even substrate. The existing ceramic tile must be thoroughly inspected for several key factors. First, examine the tiles for any cracks, chips, or loose pieces. Any damaged tiles must be repaired or replaced before proceeding. Even minor imperfections can telegraph through the vinyl plank flooring over time, leading to an uneven and unsightly finish.
Second, evaluate the overall levelness of the tile floor. Significant variations in height between tiles, or a general slope to the floor, will need to be addressed. Self-leveling compound or patching compound can be used to correct minor imperfections and create a smooth, even surface. For more substantial irregularities, professional assistance may be required.
Third, inspect the grout lines. Deep or wide grout lines can also telegraph through the vinyl plank flooring. Filling these grout lines with a cement-based patching compound is crucial to create a flat, uniform surface. The compound should be allowed to dry and harden completely before proceeding to the next step.
Finally, ensure the ceramic tile surface is clean and free of any debris, grease, or wax. Residue can interfere with the adhesion of the vinyl plank flooring or the leveling/patching compounds used during preparation. A thorough cleaning with a degreasing cleaner is recommended, followed by a rinse with clean water and complete drying.
Preparing the Ceramic Tile Surface
Proper preparation of the ceramic tile surface is arguably the most critical step in laying vinyl planks successfully. Neglecting this stage can lead to various problems, including adhesive failure, uneven flooring, and reduced lifespan of the vinyl planks. The preparation process involves several key steps aimed at creating a smooth, clean, and stable substrate.
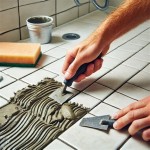
Once the tiles have been thoroughly cleaned and any loose or damaged tiles have been repaired or replaced, the next step is to address the grout lines. As mentioned earlier, deep or wide grout lines can create noticeable indentations in the vinyl plank flooring over time. To mitigate this, fill the grout lines with a cement-based patching compound. Apply the compound liberally, ensuring it completely fills the grout lines and slightly overlaps onto the tile surface. Use a wide putty knife or trowel to smooth the compound and feather it out to create a seamless transition between the tile and the grout lines.
After the grout lines have been filled and the patching compound has completely dried according to the manufacturer's instructions, lightly sand the entire surface to remove any high spots or imperfections. This will further ensure a smooth and even surface for the vinyl plank flooring. Use a fine-grit sandpaper (such as 120-grit or higher) and a sanding block to avoid damaging the tile surface. Vacuum the sanded surface thoroughly to remove any dust or debris.
For enhanced adhesion, consider applying a primer specifically designed for use with vinyl plank flooring. The primer will create a bond between the ceramic tile surface and the vinyl plank adhesive, further preventing issues like peeling or lifting. Follow the primer manufacturer's instructions for application and drying times.
Selecting the Right Vinyl Plank Flooring
The type of vinyl plank flooring selected also plays a significant role in the success of the installation over ceramic tile. There are various types of vinyl plank flooring available, each with its own characteristics and suitability for different applications. Understanding these differences is essential to making an informed decision.
Consider the thickness of the vinyl plank. Thicker planks generally offer better durability and are more forgiving of minor imperfections in the underlying surface. They also tend to be more resistant to telegraphing, which is the phenomenon where the texture or pattern of the underlying surface becomes visible through the vinyl plank flooring.
The type of locking system is another important factor. Click-lock systems are popular for their ease of installation. However, some click-lock systems are more robust and durable than others. Look for planks with a tight, secure locking mechanism that will prevent gaps from forming over time. Also, consider the width and length of the planks. Wider and longer planks can make a room appear larger and can often be installed more quickly. However, they may also be more difficult to maneuver in smaller spaces.
Pay attention to wear layer thickness. The wear layer is the protective top layer of the vinyl plank that protects it from scratches, scuffs, and stains. A thicker wear layer will provide greater protection and extend the lifespan of the flooring. For high-traffic areas, choose vinyl plank flooring with a thicker wear layer.
Finally, consider the overall aesthetic and design of the vinyl plank flooring. Choose a style that complements the existing décor of the room and that will provide the desired look and feel. Consider factors such as color, texture, and pattern.
Potential Challenges and Considerations
While laying vinyl planks over ceramic tile is often a viable option, there are several potential challenges and considerations to keep in mind to ensure a successful outcome. These include moisture, height differences, and potential for future tile removal.
Moisture is a significant concern, particularly in bathrooms and kitchens. Ceramic tile is generally water-resistant, but the grout lines can be susceptible to moisture penetration. Ensure the underlying ceramic tile is completely dry before installing the vinyl planks. Consider using a moisture barrier underlayment to further protect the flooring from moisture damage. This is especially important in below-grade installations or areas prone to dampness.
The added height of the vinyl plank flooring can create transitions with adjacent flooring surfaces. This height difference may require the installation of transition strips to provide a smooth and safe transition between the different flooring types. Carefully measure the height difference and select transition strips that are appropriate for the application.
Consider the potential for future tile removal. While covering the existing tile can save time and money initially, it may create difficulties if the tile needs to be removed in the future. Removing vinyl planks adhered to ceramic tile can be more challenging and time-consuming than removing vinyl planks installed over a different substrate. Take this into account when making the decision to install vinyl planks over ceramic tile.
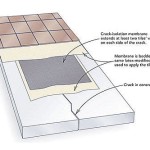
Consider the potential for subfloor movement. If the subfloor beneath the ceramic tile is prone to movement, it can cause the tiles to crack or shift, which, in turn, can affect the stability of the vinyl plank flooring. Address any subfloor issues before installing the ceramic tile or the vinyl planks. This may involve reinforcing the subfloor or adding additional supports.
Finally, be aware of potential warranty implications. Some vinyl plank flooring manufacturers may have specific requirements or recommendations for installation over ceramic tile. Failure to follow these guidelines could void the warranty. Always consult with the manufacturer's instructions and guidelines before beginning the installation.

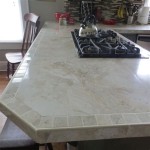
New Vinyl Plank Flooring Over Tile Table And Hearth

New Vinyl Plank Flooring Over Tile Table And Hearth

New Vinyl Plank Flooring Over Tile Table And Hearth

Can You Put Vinyl Plank Flooring Over Ceramic Tile Floors Blvd

New Vinyl Plank Flooring Over Tile Table And Hearth

Lvt Flooring Over Existing Tile The Easy Way Vinyl Floor Installation Diy

Can You Install Vinyl Plank Over Tile Flooring America

New Vinyl Plank Flooring Over Tile Table And Hearth

Lvt Flooring Over Existing Tile The Easy Way Vinyl Floor Installation Diy

How To Install Luxury Vinyl Plank Over Tile Flooring
Related Posts