Which Side To Tile On Hardibacker
Hardibacker is a popular choice for tile backer board due to its durability, moisture resistance, and ease of installation. However, a common question arises among DIY enthusiasts and professional tile installers: which side of the Hardibacker should the tile be installed on? This article will delve into the nuances of Hardibacker installation, providing clear and concise instructions to ensure a successful tiling project.
Understanding Hardibacker's Construction
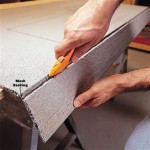
Hardibacker is composed of a cement-based core reinforced with fiberglass mesh. One side features a smooth, gray surface, while the other displays a slightly rougher texture. The smooth side is often referred to as the "back" side, while the rougher side is known as the "front" side. The difference between these two sides lies in how the manufacturer intends them to be used.
The Importance of the Rough Side
The rough side of Hardibacker is designed to provide increased adhesion for tile mortar. The texture creates a mechanical bond that helps prevent tiles from slipping or detaching during installation. The rougher surface also allows the mortar to spread more evenly, ensuring stronger adherence to the substrate. Many tile manufacturers explicitly recommend installing tiles directly on the rough side of Hardibacker for optimal results.
Smooth Side Considerations
While the smooth side of Hardibacker can technically be used for tile installation, it is generally not recommended. The lack of texture reduces the strength of the bond between the tile mortar and the substrate. This can result in a weaker installation, potentially leading to tile slippage or even cracking. Furthermore, the smooth surface may not provide adequate drainage for moisture, which can lead to mold growth behind the tiles.
Advantages of Using the Rough Side
Utilizing the rough side of Hardibacker for tile installation offers several advantages:
- Enhanced Adhesion: The textured surface provides superior mechanical bonding, ensuring stronger and more secure tile installation.
- Improved Mortar Bonding: The rough texture facilitates even spreading of the mortar, leading to a more consistent bond between the tile and the Hardibacker.
- Increased Moisture Resistance: The rough surface allows for better drainage of moisture, reducing the risk of mold and mildew growth.
- Long-Term Durability: The robust adhesion and moisture resistance of the rough side installation contribute to a more durable and long-lasting tile installation.
While some installers might opt for the smooth side for aesthetic reasons, the superior bonding and moisture resistance of the rough side make it the recommended choice for most tile installations on Hardibacker.
Installing Tiles on Hardibacker: A Step-by-Step Guide
To ensure a successful tile installation on Hardibacker, adhere to the following steps:
- Prepare the Subfloor: Ensure the subfloor is level and smooth. Correct any imperfections or structural issues before proceeding.
- Install the Hardibacker: Cut and attach the Hardibacker panels to the subfloor using screws or construction adhesive. Maintain proper spacing between panels for expansion and contraction.
- Apply Mortar to the Rough Side: Spread a thin layer of tile mortar onto the rough side of the Hardibacker, using a notched trowel to create grooves for good adhesion.
- Install the Tiles: Press the tiles firmly onto the mortar, ensuring the grout lines are even and consistent.
- Grout the Joints: Apply grout between the tiles, allowing it to set according to the product specifications.
- Clean Up: Wipe away any excess grout with a damp sponge to reveal the final tile installation.
Always consult the specific instructions provided by the Hardibacker manufacturer and tile manufacturer for detailed installation recommendations and best practices.
Conclusion
Choosing the right side of Hardibacker for tile installation is crucial for a successful, durable, and aesthetically pleasing finish. Always install tiles directly on the rough side of Hardibacker to maximize adhesion, moisture resistance, and long-term stability. This approach will ensure a robust and beautiful tile installation that can withstand the test of time.

How To Install Hardiebacker Cement Board On Floors James Hardie Pros

How To Install Cement Board For Tile Projects Diy Family Handyman

Easily Install Cement Board To Prep For Tile Installation

Hardiebacker Square Edge Backerboard H 1200mm W 800mm T 12mm Diy At B Q

How To Install Cement Board The Home Depot

How To Install Cement Board The Home Depot

Hardie Backer Boards Everything You Need To Know Walls And Floors

Tile Installation Backer Board Around A Bathtub Family Handyman

How To Cut Hardiebacker Cement Board James Hardie Pros

How To Install Cement Backer Board For Floor Tile Installation The Home Depot
Related Posts

