How To Lay Down Backer Board For Tile
Installing tile, whether on floors, walls, showers, or backsplashes, often requires a solid, stable, and moisture-resistant substrate. Backer board, specifically cement backer board, is the preferred choice for creating this foundation. Properly installed backer board provides a durable surface that resists moisture, prevents tile cracking, and ensures the longevity of the tile installation.
This article details the step-by-step process of laying down backer board for tile, covering the necessary tools, materials, preparation, and installation techniques. Adhering to these guidelines ensures a professional and long-lasting tile installation.
Key Point 1: Preparing the Subfloor or Wall
The first, and arguably most important, step in laying backer board is preparing the surface to which it will be attached. A clean, level, and structurally sound subfloor or wall is critical for a successful installation. Failure to adequately prepare the surface can lead to problems such as uneven tile, cracked grout, and even water damage in the long run.
For floor installations, begin by removing any existing flooring, including vinyl, linoleum, carpet, or old tile. Thoroughly clean the subfloor, removing any debris, old adhesives, nails, or staples. Use a scraper or putty knife to remove stubborn adhesive residue. A vacuum cleaner can effectively remove loose dust and particles.
Inspect the subfloor for any signs of damage, such as rot, water stains, or soft spots. These issues must be addressed before proceeding. Repair or replace any damaged sections of the subfloor. If the subfloor is significantly uneven, self-leveling compound may be necessary to create a flat surface. Allow the self-leveling compound to dry completely according to the manufacturer's instructions.
For wall installations, the preparation process is similar. Remove any existing wall coverings, such as wallpaper, paint, or old tile. Clean the wall thoroughly, removing any debris or adhesive residue. Inspect the wall for signs of damage, such as cracks or water stains. Repair any damage before proceeding. Ensure the studs are straight and properly spaced. If necessary, shim the studs to create a plumb and even surface.
In both floor and wall applications, it is essential to check the subfloor or wall for levelness. Use a level and a straightedge to identify any high or low spots. If necessary, use shims to level the surface before installing the backer board.
Key Point 2: Cutting and Fitting the Backer Board
Accurate cutting and fitting of the backer board are crucial for creating a seamless and professional-looking tile installation. Precise cuts minimize gaps between boards, preventing moisture penetration and ensuring a stable surface for the tile.
Measure the area where the backer board will be installed. Accurately transfer these measurements to the backer board. Several methods can be used to cut backer board. One common method involves scoring the board with a utility knife and snapping it along the score line. Multiple passes with the utility knife are generally necessary to create a deep enough score. Another method involves using a circular saw with a blade specifically designed for cutting cement board. Ensure the work area is well-ventilated when using a circular saw, as cutting backer board generates a significant amount of dust. Safety glasses and a dust mask are essential protective gear.
When cutting backer board around pipes, fixtures, or other obstructions, use a jigsaw or hole saw. Measure the diameter of the pipe or fixture and transfer the measurement to the backer board. Use the appropriate size hole saw to create a clean, precise hole. For irregular shapes, a jigsaw can be used to cut the backer board to the desired shape.
Dry-fit the backer board to ensure a proper fit before applying any thin-set mortar or fasteners. Check for gaps between the boards and around edges. If necessary, trim the boards to achieve a snug fit. Small gaps can be filled with thin-set mortar during the installation process, but larger gaps should be avoided. Stagger the backer board seams to prevent continuous lines that can weaken the installation. This is particularly important on floors.
When installing backer board on walls, ensure the boards are properly aligned with the studs. The edges of the backer board should land on the center of a stud to provide adequate support for the fasteners. If necessary, add additional studs or blocking to provide support for the edges of the boards.
Key Point 3: Installing the Backer Board with Thin-Set Mortar and Fasteners
Applying thin-set mortar beneath the backer board and securing it with appropriate fasteners is essential for creating a strong and moisture-resistant bond between the backer board and the subfloor or wall. This process provides added stability and prevents the backer board from shifting or cracking over time.
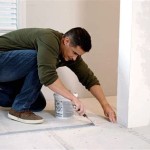
Choose a high-quality thin-set mortar specifically designed for use with cement backer board. Mix the thin-set mortar according to the manufacturer's instructions. A notched trowel is used to apply the thin-set mortar to the subfloor or wall. Select the appropriate notch size for the thickness of the backer board. Generally, a 1/4" x 1/4" notched trowel is suitable for most backer board installations.
Apply a generous layer of thin-set mortar to the subfloor or wall, covering the entire area where the backer board will be installed. Use the notched trowel to create ridges in the thin-set mortar. These ridges help to create a stronger bond between the backer board and the subfloor or wall. Immediately place the backer board onto the thin-set mortar, ensuring it is properly aligned. Press firmly on the backer board to embed it into the thin-set mortar and ensure good contact. Move the backer board slightly back and forth to ensure good adhesion.
Use backer board screws or nails specifically designed for this purpose to secure the backer board to the subfloor or wall. These fasteners are typically corrosion-resistant and designed to minimize cracking of the backer board. Follow the manufacturer's recommendations for the spacing of the fasteners. Generally, fasteners should be spaced every 6-8 inches along the edges and in the field of the backer board. Drive the fasteners flush with the surface of the backer board, without over-driving them. Over-driving the fasteners can damage the backer board and compromise its strength.
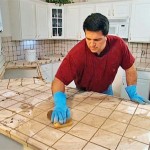
After installing all of the backer board, tape the seams between the boards with fiberglass mesh tape. Apply a thin layer of thin-set mortar over the tape, feathering it out to create a smooth, even surface. This helps to prevent cracking along the seams and provides a waterproof barrier. Allow the thin-set mortar to dry completely according to the manufacturer's instructions before proceeding with the tile installation.
For wall installations, ensure the fasteners penetrate deeply enough into the studs to provide adequate support. If necessary, use longer fasteners to reach the studs. Check the backer board for plumb and level. If necessary, adjust the alignment of the boards before the thin-set mortar dries. Support the backer board with temporary braces until the thin-set mortar has fully cured. This prevents the boards from shifting during the curing process.
Carefully inspect the installed backer board for any loose fasteners or uneven seams. Tighten any loose fasteners and fill any gaps or imperfections with thin-set mortar. Allow the thin-set mortar to dry completely before proceeding with the tile installation. Properly installed backer board provides a solid, stable, and moisture-resistant foundation for the tile, ensuring a long-lasting and beautiful result.
By following these steps and paying close attention to detail, a successful and durable backer board installation can be achieved, providing an ideal foundation for any tiling project. Always consult the manufacturer's instructions for specific recommendations regarding the installation of their products.

How To Install Cement Board On A Floor Diy Family Handyman

How To Install Cement Backer Board For Floor Tile Installation The Home Depot

How To Install Hardiebacker Cement Board On Floors James Hardie Pros

Installing Cement Backerboard For Tile Flooring Hometips

Easily Install Cement Board To Prep For Tile Installation

How To Install Cement Board The Home Depot

How To Install Backer Board Durock For Floor Tile

How To Install Cement Board For Tile Projects Diy Family Handyman

How To Install Cement Board The Home Depot

Install Tile Backer Board On Sub Floor Icreatables Com
Related Posts