How to Put Down Backer Board for Tile
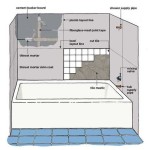
Backer board, often referred to as cement board or tile backer board, is a crucial component in any tile installation. It provides a solid, moisture-resistant surface for tile to adhere to, preventing cracking, warping, and other problems that can occur when tile is directly applied to drywall or other porous surfaces. Installing backer board correctly is essential for a successful and durable tile installation.
1. Preparing the Surface
Before installing backer board, it is essential to prepare the substrate to ensure a smooth and even surface. This involves removing any existing wall coverings, such as wallpaper or paint, and cleaning the surface thoroughly. Any imperfections, such as bumps or cracks, should be addressed by patching or sanding. This step is crucial as any irregularities in the substrate will be transferred to the tile surface.
For existing drywall, the substrate should also be primed with a moisture-resistant primer to prevent moisture from seeping through the drywall and damaging the backer board. This step is particularly important in wet areas such as bathrooms and kitchens.
2. Cutting and Installing the Backer Board
Backer board comes in various sizes and thicknesses, and it is important to choose the appropriate size and thickness for the specific project. For walls, 1/4-inch thick backer board is typically sufficient, while thicker boards may be necessary for floors or for areas with high foot traffic.
Once the backer board has been chosen, it needs to be cut to size. It can be cut using a circular saw, a utility knife, or a specialized backer board saw. When cutting backer board, it is important to wear eye protection and a dust mask and to ensure that the saw blade is sharp to prevent chipping or splintering.
The backer board is then installed using construction adhesive and screws. Construction adhesive is applied to the back of the board, and then the board is pressed firmly against the wall. The screws are driven through the board and into the wall studs, ensuring that they are spaced appropriately. For walls, the screws should be placed every 8 inches to ensure that the board is securely attached. Additionally, backer board should be overlapped by at least 1/2 inch at the seams, and the seams should be sealed with a waterproof sealant. This helps create a water-tight barrier and prevents moisture from seeping into the wall.
3. Finishing Touches
After the backer board is installed, the next step is to prepare the surface for tiling. This involves smoothing out any rough edges with sandpaper or joint compound, as well as filling in any gaps or seams with a waterproof sealant. Finally, the surface should be primed with a tile primer to ensure proper adhesion of the tile mortar.
By following these steps, you can ensure that your backer board installation is strong, durable, and ready for the next step in your tile project.

How To Install Hardiebacker Cement Board On Floors James Hardie Pros

How To Install Cement Board The Home Depot

How To Install Cement Board On A Floor Diy Family Handyman

How To Install Cement Board The Home Depot

Tile Backerboard Material Options Fine Homebuilding

Cement Backerboard Floor Tile Installation Uncookie Cutter

How To Install Tile Backer Board On A Wood Subfloor Diy

Easily Install Cement Board To Prep For Tile Installation

How To Install Cement Board For Tile Projects Diy Family Handyman

How To Install Cement Backer Board For Floor Tile Installation The Home Depot
Related Posts


