Can You Install Ceramic Tile Over Cement Board? A Comprehensive Guide
The question of whether ceramic tile can be installed over cement board is a common one for both professional tile installers and DIY homeowners undertaking tiling projects. The short answer is yes, ceramic tile can be successfully installed over cement board. In fact, cement board is widely considered an ideal substrate for ceramic tile installations in wet and dry environments due to its inherent properties. This article will delve into the reasons why cement board is preferred, the necessary preparations, the installation process, and important considerations to ensure a long-lasting and aesthetically pleasing tile installation.
Cement board, sometimes referred to as cement backer board, is a rigid panel composed primarily of cement, reinforced with fiberglass mesh. This composition gives cement board several advantages over other substrates like drywall or plywood when used as underlayment for ceramic tile. Unlike these materials, cement board is highly resistant to moisture, significantly reducing the risk of mold growth, warping, and eventual tile failure. This moisture resistance is particularly crucial in areas such as bathrooms, kitchens, and laundry rooms where exposure to water is frequent.
Beyond its moisture resistance, cement board provides a dimensionally stable surface. This means it is less prone to expansion and contraction due to temperature and humidity fluctuations. Such stability is critical in preventing cracks in the tile and grout lines over time. The rigidity of cement board also creates a solid foundation that can support the weight of the tile and foot traffic without deflection, further contributing to the longevity of the installation.
The surface of cement board is designed to provide a strong mechanical bond with the thin-set mortar used to adhere the tile. This rough texture, combined with the alkali resistance of the cement, allows the mortar to properly cure and develop a tenacious grip on the substrate. This contrasts with smooth surfaces like painted drywall, which require special primers or bonding agents to ensure proper mortar adhesion.
Understanding the Advantages of Cement Board as a Tile Substrate
Cement board's popularity as a tile substrate stems from a confluence of positive attributes that directly address common challenges in tile installation. Considering its advantages provides a clear understanding of why it's a preferred choice over alternative materials.
Primarily, cement board's resistance to water damage is paramount. Traditional building materials like drywall and plywood are porous and susceptible to moisture absorption. This absorbed moisture can lead to swelling, warping, and the growth of mold and mildew, all of which can compromise the structural integrity of the substrate and the tile installation. Cement board, on the other hand, is engineered to withstand prolonged exposure to moisture without degrading, making it the ideal choice for moisture-prone areas. This resistance minimizes the risk of costly repairs and ensures a healthier indoor environment.
Secondly, the dimensional stability of cement board is crucial for preventing cracking in the tile and grout. Substrates that expand and contract with temperature and humidity changes can place stress on the tile, leading to cracks. Cement board's minimal expansion and contraction coefficient significantly reduces this risk. This stability allows the tile installation to remain intact and aesthetically pleasing for many years. This rigidity also helps prevents lippage of the tile during installation.
Finally, the surface texture of cement board provides an excellent bonding surface for thin-set mortar. This ensures a strong and durable bond between the tile and the substrate, preventing the tile from becoming loose or detached over time. This strong bond is essential for withstanding the stresses of daily use, including foot traffic and cleaning.
Preparing for Tile Installation Over Cement Board
Proper preparation is essential for a successful tile installation over cement board. This involves several crucial steps, starting with ensuring the subfloor is structurally sound and level. Any weakness or unevenness in the subfloor will telegraph through the cement board and ultimately affect the tile installation.
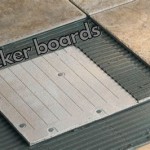
The cement board should be cut to size using a utility knife and straight edge. It is important to score the board deeply several times before snapping it along the scored line. This will create a clean, straight edge. Dust created during this process should be controlled with proper ventilation and protective equipment.
Once cut, the cement board should be installed according to the manufacturer's instructions. Typically, this involves applying a bed of thin-set mortar to the subfloor using a notched trowel. The cement board is then placed on top of the mortar and fastened to the subfloor with cement board screws. The screws should be driven flush with the surface of the board, but not so deep that they strip the threads.
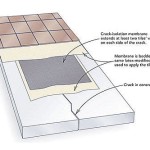
It is crucial to leave a small gap (approximately 1/8 inch) between the cement board panels to allow for slight movement and prevent cracking. These gaps should be filled with thin-set mortar and covered with fiberglass mesh tape. The tape should be embedded in the mortar and smoothed out to create a seamless transition between the panels. This process is vital to create a monolithic surface that will minimize the risk of cracking in the tile installation.
Before tiling, it is advisable to prime the surface of the cement board with a latex-modified primer. This will improve the adhesion of the thin-set mortar and help to prevent the cement board from absorbing too much moisture from the mortar. The primer should be applied according to the manufacturer's instructions and allowed to dry completely before tiling.
The Tile Installation Process on Cement Board
Once the cement board is properly installed and prepared, the tile installation process can begin. This involves using thin-set mortar to adhere the ceramic tile to the cement board. Choosing the correct type of thin-set mortar is crucial for a successful installation. Latex-modified thin-set mortars are generally recommended for tile installations over cement board due to their enhanced bonding properties and flexibility.
The thin-set mortar should be mixed according to the manufacturer's instructions. It is important to use the correct amount of water to achieve the proper consistency. The mortar should be smooth and creamy, similar to peanut butter. Avoid adding too much water, as this can weaken the mortar and compromise the bond.
Using a notched trowel of the appropriate size for the tile being installed, apply a layer of thin-set mortar to the cement board. The trowel should be held at a 45-degree angle and pressed firmly against the surface to create ridges in the mortar. These ridges will help to ensure proper coverage and bonding of the tile.
Place the tile onto the mortar bed and press firmly into place. Use a slight twisting motion to ensure good contact between the tile and the mortar. Use tile spacers to maintain consistent grout lines between the tiles. Regularly check the level of the tiles using a level and make adjustments as needed.
After the tile has been installed, allow the thin-set mortar to cure completely according to the manufacturer's instructions. This typically takes 24 to 72 hours. Avoid walking on the tile during the curing process to prevent disturbing the bond.
Once the mortar has cured, the grout can be applied. Choose a grout color that complements the tile and follow the manufacturer's instructions for mixing and application. Use a grout float to push the grout into the joints between the tiles. Remove excess grout with a damp sponge and allow the grout to cure completely before sealing. Sealing the grout will protect it from stains and moisture damage.
Finally, clean the tile surface thoroughly to remove any remaining grout haze. Inspect the installation for any imperfections and make any necessary repairs. A well-executed tile installation over cement board will provide a durable, beautiful, and long-lasting surface.
In summary, installing ceramic tile over cement board is a well-established and reliable method for creating a durable and water-resistant tile surface. By understanding the advantages of cement board, properly preparing the substrate, and following the correct installation procedures, both professionals and DIY enthusiasts can achieve successful and aesthetically pleasing results. The key lies in meticulous attention to detail and adherence to industry best practices. Careful consideration should be given to the specific requirements of each project to ensure optimal performance and longevity of the tile installation.

How To Install Cement Board On A Floor Diy Family Handyman

How To Install A Cement Board For Tiling Beaumont Tiles

How To Install Cement Board For Tile Projects Diy Family Handyman

How To Install Cement Board The Home Depot

How To Install Cement Board The Home Depot

How To Install Hardiebacker Cement Board On Floors James Hardie Pros
:max_bytes(150000):strip_icc()/can-you-install-tile-directly-on-concrete-1822600-04-458f7bb6c78348c1835cf8054ef36553.jpg?strip=all "How To Install Tile Over Concrete")
How To Install Tile Over Concrete

How To Install Cement Board For Tile Projects Diy Family Handyman

Tile Backerboard Material Options Fine Homebuilding

How To Install Cement Backer Board For Floor Tile Installation The Home Depot
Related Posts