Can You Lay Floor Tiles on Cement? A Comprehensive Guide
The question of whether floor tiles can be successfully laid on a cement substrate is a common one for homeowners and construction professionals alike. The answer is generally yes, but the success depends heavily on proper preparation, understanding the characteristics of both the cement and the tile being used, and employing appropriate installation techniques. Ignoring these factors can lead to tile failure, including cracking, lifting, and grout deterioration. This article will detail the critical aspects of laying floor tiles on cement, encompassing preparation, materials, and best practices.
Cement, often in the form of a concrete slab or a cement-based screed, provides a common and structurally sound base for many flooring applications. However, cement's inherent properties necessitate careful consideration before tiling. Cement is porous, meaning it absorbs moisture. It is also subject to expansion and contraction due to temperature and humidity fluctuations. Moreover, surface imperfections, such as cracks, unevenness, and dust, can negatively impact tile adhesion. Without addressing these potential issues, the bond between the tile and the cement will be compromised.
Choosing the right type of tile for a cement floor also plays a crucial role. Different tile materials have varying properties regarding water absorption, flexibility, and weight. Ceramic, porcelain, natural stone, and even some types of vinyl tiles can be successfully installed on cement, provided the appropriate installation system is used and the specific characteristics of the cement substrate are accounted for. Ultimately, a successful tiling project hinges on a thorough understanding of these aspects and the application of proven techniques.
Key Point 1: Preparing the Cement Substrate
Proper preparation of the cement substrate is arguably the most important factor in ensuring the longevity and integrity of a tiled floor. A poorly prepared substrate will inevitably lead to problems down the line, regardless of the quality of the tile or the expertise of the installer. The preparation process typically involves several essential steps.
The first step is cleaning the surface thoroughly. This entails removing any loose debris, dirt, dust, grease, or existing coatings that could interfere with the adhesion of the tile adhesive. Sweeping and vacuuming are essential for removing loose particles. For more stubborn contaminants like grease or oil, a suitable degreaser should be used, followed by rinsing with clean water. The cement surface must be completely dry before proceeding. Allowing sufficient drying time, which can vary depending on environmental conditions and the porosity of the cement, is vital.
Next, the cement surface needs to be inspected for cracks, holes, and unevenness. Small cracks, hairline cracks, or shrinkage cracks, often seen in concrete slabs, can be treated with crack isolation membranes or crack repair compounds. These materials bridge the cracks and prevent them from propagating through the tile layer. Larger cracks, indicative of structural issues, may require more extensive repairs, potentially involving reinforcement or even replacement of sections of the cement slab. Holes and unevenness should be filled with a cement-based patching compound or self-leveling underlayment. The choice of product depends on the depth and extent of the irregularities. Self-leveling underlayments are particularly useful for correcting significant deviations in levelness over a large area.
Leveling the cement surface is critical for ensuring a professional and aesthetically pleasing tile installation. Even slight variations in levelness can result in uneven tiles, lippage (where one tile edge is higher than the adjacent tile), and potential tripping hazards. A long, straight edge or a laser level can be used to identify high and low spots. These areas can then be corrected using patching compounds or self-leveling underlayments as previously mentioned. It is important to allow these leveling compounds to fully cure according to the manufacturer's instructions before proceeding with tile installation.
Finally, priming the cement surface is a crucial step that is often overlooked. Primers improve the adhesion of the tile adhesive to the cement. They also help to reduce the porosity of the cement, preventing the cement from drawing moisture out of the adhesive too quickly, which can weaken the bond. Choosing the right primer is important. Some primers are designed for porous surfaces, while others are formulated for non-porous surfaces. Always consult the adhesive manufacturer's recommendations for the appropriate primer for the specific adhesive and tile being used. The primer should be applied evenly and allowed to dry completely before tiling begins.
Key Point 2: Choosing the Right Tile and Adhesive
Selecting the appropriate tile and adhesive is just as important as preparing the cement substrate. The tile must be suitable for the intended use and wear conditions, and the adhesive must be compatible with both the tile and the cement.
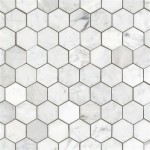
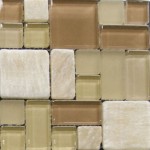
Tile selection should be based on several factors, including the type of room, the amount of foot traffic, the likelihood of moisture exposure, and aesthetic preferences. For high-traffic areas like hallways or kitchens, durable tiles with a high abrasion resistance rating (PEI rating) are recommended. Porcelain tiles are generally a good choice for these areas due to their strength and low water absorption. For bathrooms or other areas prone to moisture, tiles with a low water absorption rate are essential to prevent water damage. Natural stone tiles, while aesthetically pleasing, often require sealing to protect them from stains and moisture. The size and shape of the tile can also influence the choice of adhesive and installation technique. Larger tiles, for example, may require a thicker adhesive bed and a more robust leveling system.
Choosing the correct adhesive is equally important. Cement-based mortars are the most common type of adhesive used for tiling on cement. These mortars are available in various formulations, each with specific characteristics and applications. Thin-set mortars are generally suitable for most tile types and applications. Modified thin-set mortars contain polymers that improve their flexibility, adhesion, and water resistance. These are particularly recommended for larger tiles, areas subject to movement or vibration, and exterior applications. Epoxy mortars are a more expensive option but offer superior strength, chemical resistance, and waterproofing. They are often used in commercial kitchens, laboratories, and other demanding environments. Selecting the correct ANSI (American National Standards Institute) specification for the mortar is necessary to ensure performance.
The adhesive must be compatible with both the tile and the cement. The manufacturer's recommendations should always be consulted to ensure that the adhesive is suitable for the specific tile type and substrate. Some tiles, such as certain types of natural stone, may require a special adhesive to prevent staining or discoloration. Similarly, some cement surfaces may require a specific type of primer to ensure proper adhesion. Failure to use the appropriate adhesive can result in tile failure and costly repairs.
In addition to the adhesive, grout selection is also critical. The grout fills the spaces between the tiles and provides a watertight seal. Cement-based grouts are the most common type of grout used for tiling. They are available in sanded and unsanded varieties. Sanded grout is used for larger grout joints, while unsanded grout is used for smaller grout joints to prevent scratching the tile surface. Epoxy grouts are a more durable and stain-resistant option but are also more expensive and difficult to install. The grout color should also be carefully considered, as it can significantly impact the overall appearance of the tiled floor.
Key Point 3: Best Practices for Tile Installation
Even with proper substrate preparation and material selection, a successful tile installation requires adherence to best practices. These practices ensure that the tiles are properly bonded to the cement, that the grout lines are straight and consistent, and that the finished floor is level and aesthetically pleasing.
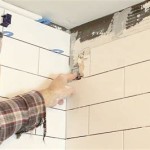
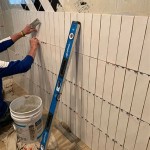
The layout of the tiles should be carefully planned before installation begins. This involves determining the starting point, the alignment of the tiles, and the placement of any cuts. A well-planned layout can minimize the number of cuts required, reduce waste, and create a more visually appealing pattern. A chalk line or laser level can be used to mark the layout lines on the cement surface. Dry-laying the tiles before applying adhesive can also help visualize the layout and identify any potential problems.
Applying the adhesive correctly is crucial for ensuring a strong bond between the tile and the cement. The adhesive should be applied evenly to the cement surface using a notched trowel. The notch size should be appropriate for the size and type of tile being used. The adhesive should be applied in small sections to prevent it from drying out before the tiles are placed. The tiles should be pressed firmly into the adhesive with a slight twisting motion to ensure full coverage. Excess adhesive that squeezes out between the tiles should be removed immediately.
Maintaining consistent grout lines is essential for a professional-looking tile installation. Tile spacers should be used to ensure uniform spacing between the tiles. The size of the spacers will depend on the desired grout joint width. The spacers should be removed after the adhesive has set but before the grout is applied. Straight grout lines can be achieved by using a grout float and working in a diagonal direction across the tiles.
Cutting tiles accurately is necessary for fitting them around obstacles and creating neat edges. A tile cutter or wet saw can be used for cutting tiles. A tile cutter is suitable for straight cuts, while a wet saw is better for curved cuts or hard tiles. Safety glasses and ear protection should always be worn when cutting tiles. The cut edges of the tiles should be smooth and clean before they are installed.
Grouting the tiles should be done after the adhesive has fully cured, typically after 24-48 hours. The grout should be mixed according to the manufacturer's instructions and applied to the grout joints using a grout float. Excess grout should be removed from the tile surface with a damp sponge. The grout should be allowed to cure for the recommended time before the floor is used.
Finally, proper cleaning and sealing are essential for protecting the tiled floor and maintaining its appearance. The floor should be cleaned with a neutral cleaner to remove any remaining grout haze. Natural stone tiles should be sealed with a penetrating sealer to protect them from stains and moisture. The sealer should be applied according to the manufacturer's instructions and allowed to dry completely before the floor is used. Regular cleaning and maintenance will help to keep the tiled floor looking its best for many years to come.

How To Tile Onto Concrete Floors Porcelain Super
:max_bytes(150000):strip_icc()/can-you-install-tile-directly-on-concrete-1822600-04-458f7bb6c78348c1835cf8054ef36553.jpg?strip=all "How To Install Tile Over Concrete")
How To Install Tile Over Concrete

How To Lay Floor Tiles On Concrete Welcome The Rubi Tools Blog

How To Lay Floor Tiles On Concrete Stonesuper

Tiling Over A Ed Concrete Slab Fine Homebuilding

Materials Needed To Lay Tile Floor The Best Tools Rubi Blog Usa

How To Install Ceramic Tiles On Concrete Floor Tile Installation

How To Tile A Concrete Floor Howtospecialist Build Step By Diy Plans
:max_bytes(150000):strip_icc()/can-you-install-tile-directly-on-concrete-1822600-01-8a89ceab1a274fb8ac81890ab7fc6b1b.jpg?strip=all "How To Install Tile Over Concrete")
How To Install Tile Over Concrete

Can You Lay Outdoor Tiles Over Concrete Premier Porcelain
Related Posts