How To Lay Porcelain Tile On A Concrete Patio
A porcelain tile patio can add elegance and durability to your outdoor space. Installing porcelain tiles on a concrete patio can be a rewarding DIY project, but it requires careful planning and execution. This guide will provide a step-by-step process for laying porcelain tiles on a concrete patio, ensuring a successful and long-lasting installation.
Preparing The Concrete Patio
The success of your tile installation hinges on a properly prepared concrete patio. This step is crucial for achieving a level surface and ensuring the tiles adhere securely. Begin by cleaning the existing concrete patio thoroughly, removing any dirt, debris, or loose materials. You can use a broom, a power washer, or a combination of both to ensure a clean surface.
After cleaning, assess the condition of the concrete. Look for cracks, spalling, or unevenness. If your concrete has significant cracks, it may be necessary to repair them with a concrete patching compound. For uneven areas, you may need to apply a leveling compound.
Once the concrete is clean and smooth, it's important to ensure proper drainage. If water tends to pool on the patio after rain, you'll need to address this issue before proceeding. This could involve adjusting the slope of the concrete or installing drainage channels. Finally, apply a concrete primer to enhance the adhesion between the tile mortar and the concrete substrate.
Setting Up The Tile Layout
Before laying any tiles, create a visual plan for your layout. This will ensure a symmetrical and visually appealing design. Begin by determining the center point of the patio. Use a measuring tape and chalk line to mark the center. Next, decide on a tile pattern. Some common patterns include running bond, staggered, or basket weave. Choose a pattern that complements your patio's overall design.
Lay out your tiles dry, without mortar, along the marked lines. This dry layout allows you to visualize the pattern and adjust tile positions as needed. You can use spacers to ensure even spacing between tiles. After you're satisfied with the layout, remove the tiles and mark the locations of the first few tiles with chalk. This will serve as a guide for the mortar installation.
Installing The Tiles
With the layout established, you're ready to install the tiles. Start by mixing the mortar according to the manufacturer's instructions. Apply a thin layer of mortar to the concrete surface, using a notched trowel. The size of the notches on the trowel should match the recommended size for your tile. The mortar should be evenly distributed and cover the entire area of the first tile.
Carefully position the first tile onto the mortar bed, aligning it with the chalk lines. Make sure the tile is level and flush with the surrounding concrete. Use a rubber mallet to gently tap the tile into place and ensure a solid bond with the mortar. Repeat this process for each subsequent tile. Remember to use spacers to maintain even spacing between tiles.
After laying a few tiles, check for levelness using a level tool. If necessary, gently adjust the tiles to ensure a smooth, flat surface. As you lay the tiles, make sure to wipe off any excess mortar with a damp sponge to prevent it from drying and causing blemishes.
Grouting The Tiles
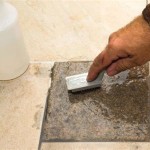
Once the mortar has cured, you can grout the tiles. Grouting seals the gaps between the tiles, preventing water penetration and enhancing the overall appearance of the patio. Choose a grout color that complements the tile color and the patio's design. Apply the grout using a grout float, pressing it firmly into the gaps between the tiles.
Allow the grout to set according to the manufacturer's instructions. Then, remove any excess grout with a damp sponge. Be sure to clean the sponge frequently to avoid smearing the grout. Once the grout has fully cured, you can seal it with a sealant to enhance its durability and prevent staining.
Finishing Touches
After the grouting has cured, the final step is to remove any remaining excess grout and clean the tiles. This can be done with a damp cloth or a grout cleaning brush. For a truly polished finish, consider sealing the tiles with a sealant designed for porcelain. This will help protect the tiles from stains and wear and tear.
Once the sealant has dried, you can enjoy your newly tiled patio. Proper maintenance includes sweeping the patio regularly to remove debris and periodically cleaning the tiles with a mild detergent. Remember that porcelain is a durable material, but still requires some care to preserve its appearance.

Concrete Patio Transformation 7 Steps To Diy A New Outdoor Oasis

Concrete Patio Transformation 7 Steps To Diy A New Outdoor Oasis

Can You Lay Outdoor Tiles Over Concrete Premier Porcelain

Concrete Patio Transformation 7 Steps To Diy A New Outdoor Oasis
:max_bytes(150000):strip_icc()/can-you-install-tile-directly-on-concrete-1822600-04-458f7bb6c78348c1835cf8054ef36553.jpg?strip=all "How To Install Tile Over Concrete")
How To Install Tile Over Concrete

Tiling Over A Ed Concrete Slab Fine Homebuilding
%202022-1.jpg?strip=all "How To Lay Porcelain Patio Paving Pavestone Natural Stone For Gardens And Driveways")
How To Lay Porcelain Patio Paving Pavestone Natural Stone For Gardens And Driveways

How To Lay Porcelain Slabs Diy Tile Patio Wood Create

How To Tile Onto Concrete Floors Porcelain Super

Laying Porcelain Tiles Outside Information And Details
Related Posts