How to Install Tile on a Concrete Patio: A Comprehensive Guide
Installing tile on a concrete patio is a project that can significantly enhance the aesthetic appeal and functionality of an outdoor living space. A tiled patio offers durability, easy maintenance, and a wide range of design possibilities. This article provides a detailed guide on how to successfully install tile on a concrete patio, covering essential preparation steps, material selection, installation techniques, and post-installation considerations.
1. Pre-Installation Assessment and Preparation
Before embarking on the tile installation, a thorough assessment of the existing concrete patio is paramount. This initial evaluation will dictate subsequent steps and ensure the longevity of the tiled surface.
Concrete Slab Inspection: The concrete slab must be structurally sound. Inspect for cracks, crumbling, or uneven surfaces. Small hairline cracks might be acceptable, but larger cracks, especially those showing signs of movement, require repair. Use a concrete crack repair kit or consult a professional for significant damage.
Surface Cleaning: Remove all dirt, debris, grease, and stains from the concrete surface. A pressure washer is effective for removing loose material. Stubborn stains, oil, or grease might require scrubbing with a degreasing agent and a stiff brush, followed by a thorough rinse. Allow the concrete to dry completely before proceeding.
Leveling the Surface: A level surface is crucial for a successful tile installation. Minor imperfections can often be addressed with a thick-bed mortar, but significant variations require more extensive leveling. Self-leveling concrete mixtures are effective for correcting slopes and creating a perfectly flat surface. Follow the manufacturer's instructions carefully for mixing and application. Allow the self-leveling compound to cure completely before proceeding.
Concrete Sealing (Optional): Applying a concrete sealer before tiling is optional but can provide added protection against moisture and enhance the bond between the concrete and the mortar. Select a penetrating sealer specifically designed for exterior concrete surfaces. Allow the sealer to cure according to the manufacturer's instructions.
Establishing Proper Drainage: Ensure that the patio has adequate drainage to prevent water from pooling on the tiled surface. This prevents potential damage from freeze-thaw cycles and reduces the risk of slips. If the patio lacks sufficient slope, consider modifying the grade or installing a drainage system before tiling.
2. Material Selection and Layout Planning
Choosing the correct materials and planning the layout are critical for achieving the desired aesthetic and ensuring the long-term performance of the tiled patio.
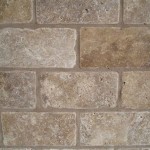
Tile Selection: Select tiles specifically designed for outdoor use. These tiles are typically made of porcelain or certain types of natural stone that are resistant to frost, moisture, and UV damage. Consider the slip resistance of the tiles, especially in areas prone to wet conditions. The Porcelain Enamel Institute (PEI) rating indicates a tile's resistance to abrasion; choose tiles with a PEI rating of 3 or higher for outdoor patios. Natural stone tiles are very durable but required being sealed properly.
Mortar Selection: Choose a mortar specifically formulated for outdoor tile installations and designed for use with the selected tile type. Polymer-modified thin-set mortars offer superior bonding strength and flexibility, which are essential for accommodating the expansion and contraction that occur with temperature fluctuations. Ensure the mortar is also suitable for exterior environments, meaning it can withstand freeze-thaw cycles.
Grout Selection: Select a grout specifically designed for outdoor use. Epoxy grout is a durable and stain-resistant option suitable for high-traffic areas. Cement-based grouts are also a viable option, but they typically require sealing to prevent water absorption and staining. Choose a grout color that complements the tiles and the overall design of the patio.
Expansion Joints: Plan for expansion joints to accommodate the natural movement of the concrete and tile due to temperature changes. These joints are typically filled with a flexible sealant. Consult with a tiling expert to determine the appropriate placement and width of expansion joints based on the size and shape of the patio.
Layout Planning: Create a detailed layout plan before applying any mortar. Start by finding the center point of the patio and working outwards. This ensures a symmetrical and visually appealing tile pattern. Use spacers to maintain consistent grout lines. Avoid small tile pieces at the edges of the patio, as these can be difficult to cut and install. If necessary, adjust the layout slightly to minimize the need for small cuts.
3. Installation Process: Mortar Application, Tile Placement, and Grouting
Following a meticulous installation process is vital for achieving a professional-looking and durable tiled patio. This phase includes correctly applying the mortar, precisely placing the tiles, and effectively grouting the spaces between them.
Mortar Application: Mix the mortar according to the manufacturer's instructions. Use a notched trowel appropriate for the size of the tiles being installed. Apply the mortar to the concrete surface in small sections, typically covering only a few square feet at a time. Hold the trowel at a 45-degree angle to create uniform ridges in the mortar. This ensures proper adhesion of the tiles.
Tile Placement: Carefully place each tile onto the mortar bed, pressing down firmly and twisting slightly to ensure good contact. Use tile spacers to maintain consistent grout lines. Periodically check the level of the tiles with a level and make adjustments as needed by tapping gently with a rubber mallet. Remove any excess mortar that squeezes up between the tiles immediately.
Cutting Tiles: Use a wet saw to cut tiles to fit around obstacles or at the edges of the patio. A wet saw provides clean, precise cuts and minimizes dust. Wear safety glasses and gloves when operating a wet saw.
Curing Time: Allow the mortar to cure completely before proceeding to the grouting stage. The curing time will vary depending on the type of mortar used and the ambient temperature and humidity. Refer to the manufacturer's instructions for specific curing recommendations.
Grouting: Remove the tile spacers and clean the grout lines thoroughly. Mix the grout according to the manufacturer's instructions. Apply the grout to the tile surface, working it into the grout lines with a grout float. Hold the float at a 45-degree angle and apply firm pressure to ensure the grout fills the lines completely.
Grout Cleaning: After the grout has partially set (typically within 15-30 minutes), use a damp sponge to remove excess grout from the tile surface. Rinse the sponge frequently in clean water. Be careful not to remove too much grout from the grout lines. After the grout has fully cured, polish the tile surface with a clean, dry cloth to remove any remaining haze.
4. Post-Installation Care and Maintenance
Proper care and maintenance are essential for preserving the appearance and prolonging the life of the tiled patio.
Sealing (if applicable): If a cement-based grout was used, apply a grout sealer to protect it from water absorption and staining. Apply the sealer according to the manufacturer's instructions. Reapply the sealer periodically, as needed.
Cleaning: Clean the tiled patio regularly with a mild detergent and water. Avoid using abrasive cleaners or harsh chemicals, as these can damage the tile and grout. Use a soft-bristled brush or mop to scrub the surface. Rinse thoroughly with clean water.
Preventative Measures: Take preventative measures to minimize damage to the tiled patio. Use mats or rugs in high-traffic areas to protect the tiles from abrasion. Avoid dropping heavy objects onto the tile surface. Promptly clean up spills to prevent staining.
Winterization: In regions with cold winters, take steps to protect the tiled patio from freeze-thaw damage. Remove standing water from the surface. Consider covering the patio with a waterproof tarp to prevent snow and ice accumulation. Use ice melt products sparingly, as some chemicals can damage the tile and grout.
By following these guidelines, individuals can successfully install tile on a concrete patio, creating an attractive, durable, and functional outdoor space.

How To Install Tile Over Concrete Greenbuildingadvisor

How To Install Tile Over An Existing Concrete Patio The Rta
:max_bytes(150000):strip_icc()/can-you-install-tile-directly-on-concrete-1822600-04-458f7bb6c78348c1835cf8054ef36553.jpg?strip=all "How To Install Tile Over Concrete")
How To Install Tile Over Concrete

Concrete Patio Transformation 7 Steps To Diy A New Outdoor Oasis

Concrete Patio Transformation 7 Steps To Diy A New Outdoor Oasis

Concrete Patio Transformation 7 Steps To Diy A New Outdoor Oasis

Concrete Patio Transformation 7 Steps To Diy A New Outdoor Oasis

How To Tile Onto Concrete Floors Porcelain Super

Can You Lay Outdoor Tiles Over Concrete Premier Porcelain

How To Create Faux Tile Look On Concrete Patio Southern Hospitality
Related Posts