Can You Tile Over a Concrete Wall?
Tiling over a concrete wall is a popular choice for bathrooms, kitchens, and other areas exposed to moisture. Concrete provides a strong and durable substrate for tile, but proper preparation and execution are crucial for a successful and long-lasting installation. This article will explore the factors to consider when tiling over concrete and the necessary steps for achieving optimal results.
One of the first considerations is the condition of the concrete surface. It must be clean, dry, and structurally sound. Any existing paint, sealant, or other coatings should be removed. Loose concrete, dust, and debris must be thoroughly cleaned. Cracks or imperfections should be repaired using an appropriate concrete patching compound. A smooth and level surface is essential for proper tile adhesion.
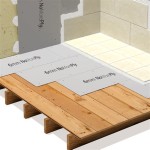
Moisture is a significant concern when tiling over concrete, particularly in below-grade applications. Concrete is porous and can absorb moisture from the ground. This moisture can migrate through the concrete and potentially damage the tile installation. Applying a waterproof membrane before tiling is often recommended, especially in areas like basements or shower walls. This membrane acts as a barrier, preventing moisture from reaching the tile and adhesive.
The type of tile adhesive used is critical for successful tile installation on concrete. Thin-set mortar is commonly used and is available in various formulations for different applications. Modified thin-set mortars offer enhanced bonding strength and flexibility, making them suitable for demanding environments. Selecting the appropriate thin-set based on the specific tile and environmental conditions is essential. Consulting product specifications and manufacturer recommendations is crucial.
Before applying tile, a primer may be necessary to improve the bonding between the concrete and the thin-set mortar. Primers are designed to enhance adhesion and create a more uniform surface for the thin-set to adhere to. Choosing the correct primer is essential, as using an incompatible primer can negatively affect the bond strength and longevity of the tile installation. Consult the primer manufacturer's instructions for compatibility with the chosen thin-set mortar.
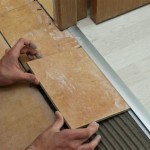
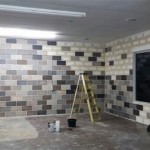
Once the concrete surface is prepared and primed, the tiling process can begin. Using the appropriate trowel size, a layer of thin-set mortar is applied to the concrete surface. The tile is then firmly pressed into the mortar, ensuring full contact and a consistent bond. Spacers are used to maintain uniform grout lines between tiles. After the thin-set has cured, the spacers are removed, and the grout is applied to fill the joints between the tiles. The grout provides a waterproof seal and enhances the overall aesthetic of the tiled surface.
Different types of tiles can be installed over concrete, including ceramic, porcelain, and natural stone. Each tile type has specific requirements for installation and maintenance. Porcelain tiles are generally denser and less porous than ceramic tiles, making them more suitable for wet areas. Natural stone tiles may require sealing to prevent staining and protect them from moisture damage. Understanding the characteristics of the chosen tile type is essential for selecting the appropriate installation methods and maintenance procedures.
The curing time for the thin-set mortar and grout is crucial for the long-term stability of the tile installation. Allowing sufficient curing time ensures that the adhesive and grout achieve their full strength and provide a durable bond. The manufacturer's recommendations regarding curing times should be strictly followed. Avoid using the tiled area until the curing process is complete to prevent damage or displacement of the tiles.
Expansion joints are an essential consideration, especially for larger tiled areas. These joints accommodate movement in the concrete substrate due to temperature fluctuations and prevent cracking or damage to the tile. Expansion joints should be incorporated at regular intervals and filled with a flexible sealant to allow for movement while maintaining a waterproof barrier.
Proper maintenance is essential for preserving the longevity and appearance of tiled concrete walls. Regular cleaning with appropriate cleaning products is recommended to remove dirt, grime, and stains. Avoid using abrasive cleaners or harsh chemicals that can damage the tile or grout. Sealing the grout periodically can help prevent staining and protect it from moisture penetration.
In summary, tiling over a concrete wall is a viable option for various applications, provided that the concrete surface is properly prepared and the appropriate materials and techniques are employed. Addressing moisture concerns, selecting the correct adhesive and primer, and following proper installation procedures are essential for achieving a successful and long-lasting tile installation. Regular maintenance and the incorporation of expansion joints further contribute to the durability and aesthetic appeal of the tiled surface.

Tile Over Blockwork Mike Haduck

How To Prepare Uneven Walls And Floors Tile

How To Install Ceramic Tiles On A Beautiful Concrete Wall Easily Construction Houses Step By

Techniques For Installing Decorative Ceramic Tiles On Concrete Wall Install Steps

How To Install Tile Over Concrete Greenbuildingadvisor

Exterior Tile Installation On Walls Floor Trends
:max_bytes(150000):strip_icc()/can-you-install-tile-directly-on-concrete-1822600-04-458f7bb6c78348c1835cf8054ef36553.jpg?strip=all "How To Install Tile Over Concrete")
How To Install Tile Over Concrete

Can I Crazy Pave Or Tile Over A Limeston Bunnings Work Community

Tiling Over Tiles Is It A Good Idea How You Can Do Right

How To Use Concrete Tile Indoors
Related Posts