Laying Floating Floorboards Over Tiles: A Comprehensive Guide
Transforming your tiled floors with the warmth and elegance of floating floorboards is a rewarding DIY project. While it may seem daunting, with the right preparation and technique, you can achieve professional-looking results. This comprehensive guide will walk you through the essential aspects of laying floating floorboards over tiles, ensuring a smooth and successful installation.
Benefits of Floating Floorboards
Floating floorboards offer several advantages over traditional flooring methods:
- Easy Installation: Floating floors click together and do not require nailing or gluing to the subfloor.
- Versatility: Suitable for a wide range of flooring materials, including laminate, vinyl, and engineered hardwood.
- Durability: Resistant to wear and tear, providing long-lasting performance.
- Water Resistance: Some floating floorboards feature water-resistant coatings, making them ideal for moisture-prone areas.
Preparing the Tile Surface
To ensure a stable and even base for the floating floorboards, the tile surface must be properly prepared:
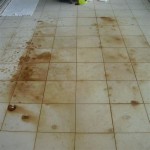
- Clean the Tiles: Remove any dirt, dust, or debris using a vacuum cleaner and mop.
- Level the Surface: Use a leveling compound or self-leveling cement to fill any unevenness in the tiles. Allow the compound to dry completely.
- Inspect the Tiles: Check for any loose, cracked, or chipped tiles. Repair or replace them as needed.
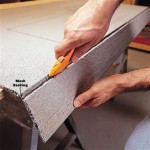
- Install an Underlayment: An underlayment provides sound insulation, moisture protection, and a smooth base for the floating floorboards. Choose an underlayment compatible with your flooring material.
Laying the Floating Floorboards
Once the tile surface is prepared, you can start laying the floating floorboards:
- Start in a Corner: Choose a corner of the room and lay the first row of floorboards along the edge, leaving a 1/2-inch expansion gap around the perimeter.
- Click-Together: Hook the end of the next floorboard onto the side of the previous one and press down to click it into place.
- Stagger the Joints: Offset the end joints of adjacent rows by at least 12 inches to prevent the seams from lining up and weakening the floor.
- Tap into Place: Use a tapping block and hammer to gently tap the floorboards into place, ensuring they are securely connected.
- Install Trim: Once all the floorboards are laid, install baseboards, moldings, and other trim pieces to finish the installation.
Maintenance and Care
Proper maintenance will extend the lifespan of your floating floorboards:
- Sweep or Vacuum: Regularly remove dust and debris using a broom or vacuum cleaner.
- Mop: Use a damp mop to clean the floor. Avoid using excessive water or harsh detergents.
- Protect from Moisture: Wipe up any spills or water damage immediately to prevent warping.
- Repair Scratches: Minor scratches can be repaired using a touch-up kit. For deeper scratches, consult the manufacturer's instructions.
Conclusion
Laying floating floorboards over tiles is a rewarding project that can transform the look and feel of your home. By following these essential steps and taking proper care of your floors, you can enjoy the beauty and durability of floating floorboards for years to come.

Can Timber Flooring Be Laid Over Tiles Cb Floors

Can You Put Laminate Flooring Over Tile Twenty Oak

Should You Install Vinyl Floor Over Tile

Advantages Disadvantages Of Floating Floors Floorings

Can You Install Wood Flooring Over Tiled Floors Havwoods

Laminate Over Ceramic Tile Problems Disadvantages Floor Techie

Can You Lay Hybrid Flooring Over Tiles The Guys

The How And Why Of Laying Floorboards Over Tiles

Install Hardwood Flooring Over Tile Floor Double Glue Down Method

How To Install Laminate Flooring Over A Tile Floor
Related Posts